Saturday, June 30, 2012

Rocking in the Fourth, Jello Style

To say that I am uber excited for this years 4th of July would be a mild understatement.

We aren't really doing anything extravagant or exciting this year that would cause this intense feeling of anticipation, it's just that this year, I actually will get to stay up and watch fireworks and enjoy the time with my family (Last year I was doing a paper route, so staying up late was not really an option).

Since I'm so impatient, I decided to get started with the celebration early with some holiday themed jello jars.


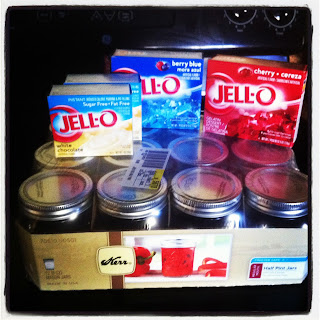
The ingredients used for this little project were Cherry Jello, Berry Blue Jello, White Chocolate pudding, milk, and blue food coloring.

I used the 8 ounce canning jars as the containers to make them in, since then there would be exactly 12 one cup servings (approx) when it was all said and done. 

Following the directions on the Berry Blue Jello Box, I prepared the blue Jello.  I actually added a few drops of blue food coloring to make sure that the blue really popped.  I didn't want any sky blueness going on in the finished product.  After the blue jello was all mixed, I divided the jello evenly between all 12 of the jars.


I immediately stowed these bad boys away in the fridge to let the jello set.  Although I could have done the quick set method and gotten them done quicker, I wanted to be sure that the jello was very firm before moving on.

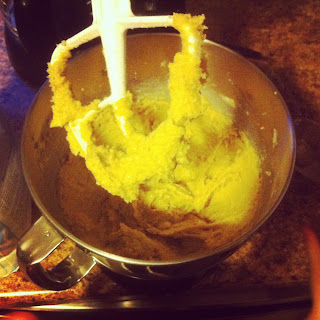
Once the blue jello has set, I mixed up the White Chocolate Pudding.  I also could have used plain jello I suppose (unflavored), but who doesn't like white chocolate pudding?  I thought that flavor over no flavor wins any day.  Once the white chocolate pudding is all mixed and ready, evenly divide the white chocolate pudding into the 12 jars. 


I smoothed the top of the pudding mixture with a spoon to make sure that it would be a flat top to put the next layer on. Then throw those delectable morsels into the fridge again to let them set firmly.


Once the white chocolate pudding is firmly set, mix up the cherry jello using the box directions.  This layer was the trickiest to get right.  Once the jello is mixed, pour carefully into the 12 jars.  I actually poured the mixture over a spoon into the jar to ensure it didn't stir up the pudding (this was a trial and error learning process.  Notice the jar in the upper right hand corner of the picture).  I didn't want chunky looking red jello (that would be disgusting looking, although still delicious).


Once the red jello has been poured into the jars, put the lids on, and put them into the fridge until the final layer of jello is firmly set.

Then devour.

Patriotic Jello Jars

6 oz. box Berry Blue Jello
6 oz. box Cherry Jello
2 - 3.3 oz. box instant white chocolate pudding
12 (8 oz) canning jars with lids
Blue Food Coloring

In a 2 or 4 cup glass measuring cup, combine one cup boiling water and blue gelatin powder while stirring constantly until dissolved. Add a few drops of blue food coloring until a patriotic blue is reached. Add enough ice to bring the water level up to two cups and stir until ice is completely dissolved. Divide gelatin evenly among the six jars (about 1/3 of a cup in each jar). Can use a canning funnel to make this less messy.

Place jars in original divider box they were purchased in (if you still have it) and put in the refrigerator for about thirty minutes.

Mix up white chocolate pudding according to box. Divide it evenly among jars by spooning it on top of blue layer. Cover jars again and return to the refrigerator for thirty minutes for pudding to set.

Remove gelatin jars from fridge and remove lids. Mix up red gelatin just as you did the blue and carefully spoon on top of white chocolate pudding. All other layers can be poured but this one needs to be spooned on top to avoid disturbing the pudding. Once all red gelatin is used, place lids on jars again and return to the refrigerator until ready to serve.


Thursday, June 28, 2012

Poppyseed Chicken

Do you have a food that just reminds you of a different time, a different place, or a favorite set of people?

That is exactly what Poppy Seed Chicken does for me.

I was first introduced to this dish last January when I went and visited my Aunt Linda in Minnesota.  We had been all been sicker than sick at her house for several days and this was the first real meal we had eaten in days.  I don't think anything had ever tasted more delicious than this dish. 

Now whenever I make it, it reminds me of my Aunt, and the warm memories of our visit with her (excluding the sick part, of course!)

Usually I don't measure the ingredients for this recipie, so you may have to tweak it a little for your own tastes as I guesstimated on the measurements somewhat.  We usually serve it over rice with some sort of vegetable on the side, and sometimes a bread.

Hopefully you enjoy it as much as my kids and I do!

Poppy Seed Chicken

1 lb. chicken, diced and cooked
1 can Cream of Chicken Soup
1 cup sour cream
1 stick of butter
1 roll of Ritz Crackers (crushed)
1/4 cup poppy seeds

Mix the cooked and diced chicken with the soup and sour cream.  Pour into a greased 9x13 pan.

In a separate bowl, mix the softened butter with the Ritz cracker pieces and poppy seeds.  Work them with your fingers like a piecrust.  Put on top of the chicken mixture.

Bake in the oven at 350 degrees for 45 minutes, uncovered.


As Pretty As She Is


Yesterday, my daughter sweetly told my hubby that once her bed and dresser are delievered, her room will be as pretty as she is.  Today is the day that her furniture was delievered.

As admirable as the thought is, and as much as I wish that had been true, I walked into a room that looked like a hurricane had been through it when I got home today. 

While the bed, dresser, and nightstand that had been delievered looked fantastic, all of Sydney's clothes were strewn in the drawers of her dresser, her doll house was tipped sideways, and her barbie dolls were all jumbled in a pile like they had been having a wild party.  (I didn't quite capture the mess with the photos, as it mostly isn't in the shot, but trust me... It was horrific)


It was time to buckle down and get to work on getting her room to look, as Sydney so eloquently put it, as pretty as she is.

After probably three hours of rearranging, sorting, and arguing with a four year old about whether a candy wrapper was garbage or a special treasure, her room is finally finished.


It is finished. 

 
I'm happy her room is clean.  She is happy she has her room set up like a "big girl" room.  And she went to bed in her own room, and her own bed, without any bribery of any sort.

Boom.  Mission accomplished.

Tuesday, June 26, 2012

Chicken, Chicken Everywhere... But not a bite to eat?

Why did the chicken cross the road? 

     ***To get to the other side***

Why did the chicken cross the basketball court?

   ***He heard the referee calling fowls***

Why did the chicken cross the road, roll in the mud, and cross the road again?

    ***Because he was a dirty double-crosser***

I know, I know, enough of the chicken jokes.  They really aren't that funny (Well, I chuckled a little when I was looking for them), but I couldn't help myself. ☺

I have chicken on the mind.  Yesterday, I picked up my order with Zaycon Foods.  I had ordered one forty (40) pound case of chicken, and today I decided I better get it packaged up.  Have you ever seen what forty pounds of chicken looks like?


That's a whole lot of chicken.

For those of you who have never heard of Zaycon Foods, they are a company that an individual can buy different products (such as chicken, bacon, beef) in bulk at a lower price than you can buy at the grocery store.  They have great quality.  The only downside to the whole service is they only come to the different locations that they deliver to during their so called "events".  So you have to get it while it's hot pretty much.  You can check them out here.

It took me a full hour and a half to package up all of the chicken, so I had plenty of time to picture all of the delicious poultry infested meals I will eventually make.  Chiken enchiladas, BBQ chicken, Chicken tacos, Orange Chicken, Chicken Wraps, Homemade Chicken Nuggets... the list goes on and on.

My family loves chicken, so it makes sense to buy so much of it.  Especially with my growing boys; although my daughter isn't far behind them in the appetite department most days.  Sometimes finding new ideas on what to make with the chicken can be a stretch.  Thank goodness for pinterest and foodgawker! 

So what is your families favorite chicken meals? 

If you have a great recipie, I'd love to hear it!

Monday, June 25, 2012

Menu Plan Monday 06/25 - 07/01


Another week has flown by!  This past week has been full of work (of course), DIY projects, car shows, and various other things.

The first half of the week, I worked on creating a zookeeping cage for my daughter's stuffed animals.


Work has been hectic with trips to the Western side of the state as well as just the general craziness of the normally day to day stuff. 

Friday evening, some friends came over and helped me clean up my garage by putting all of our holiday stuff up in the attic.  (In case y'all are reading:  Thank you so much guys!  You saved me so much time and the husband loved the extra space) 

Saturday my hubby and I took the kids to the Cool Desert Nights Car Show.  They had a blast checking out the different cars and just walking around in the nice weather.  Speaking of weather, it has been so weird here lately.  As soon as we left the car show, thunderstorms and showers hit.  Thankfully we made it back to the car before they started!


After the car show, there was a battle that could be written about in the history books.  The yellow team won, although truthfully, they cheated.  With underhand tactics such as asking "Can't we just be friends and get a cup of tea?", and then brually picking off the ones who actually believed, the green team had little hope of survival.


Here's my families game plan for the week (well at least in regards to what's for dinner)

Monday
Macaroni and Ham Casserole
Vegetables

Tuesday
Ham Steaks
Mashed Potatoes
Vegetables

Wednesday
Leftover Night

Thursday
White Rice
Vegetables

Friday
Hamburger Pie
Biscuits

Saturday
Sausage Gravy
Vegetables

Sunday
Thai Peanut Stirfry
Breadsticks


This week my nephew Tzoch is staying at our house, so it will be interesting cooking for an extra body.  Hopefully while he's here, I'll be able to make some sort of treat to celebrate him spending time with our family.

So what is your family  having this week for dinner?  Need more ideas?  Check out Laura's blog at orgjunkie.com.  Not only does she have some great ideas on her menu plans, but there are numerous links to other great gals and their weekly menu ideas. 

Sunday, June 24, 2012

Guest Posting at Untypically Jia


I'm over at Untypically Jia today writing about the June Birchbox.  Jia writes about mental illness, infertility, weight loss, and tons of other topics.  She is hilarious and always brings some great insight to what ever she is talking about.

I plan on featuring future Birchboxes here, but check out the first Birchbox post at Jia's site!

Check it out here!

Saturday, June 23, 2012

Zookeeping like a Boss

I have a confession to make.  Ever since I first joined Pinterest, I have had a distinctive urge to pin crafty projects that I never actually make.  It is addicting, and I cannot help it, I do not have the time or motivation to actually make all the neat things on the site, but I pin them anyways thinking someday, somehow, perhaps I'll actually take the initiative and do one of the projects.

Well my friends, today is that day.

Recently, my husband and I ordered a bedroom set for my four year old daughter's room.  We decided the fact that she's an amazon woman for her age (she would be in the 97% percentile, if she were five.  Again, she is only 4), necessitated an actual bed, instead of a the one she had which really is only suitable for one of Snow White's seven dwarfs.

Due to the fact that we no longer will have the same amount of space to store her toys underneath her bed as we did before, I decided we needed to come up with a storage solution for the cascading mountains of stuffed animals that are currently so unceremoniously shoved underneath her bed. 

Browsing Pinterest, I decided I finally was going to use one of the many items I'd pinned for a 'future' project.  So began the epic adventure of Sydney's Zoo.

For those of you who don't really know me, I am absolutely mechanically impaired and klutzy.  I have little patience for things that don't work right the first time.  This important fact about myself combined with the fact that we only own a screwdriver, a measuring tape, and a hammer really should have been a big warning sign to myself that maybe it wasn't a great idea to build something that didn't come out of a box and have instructions with it.

The first thing I did was of course go to Home Depot.  This was the logical spot to pick up wood, nails, latex tubing and pretty much everything else I assumed I would need for this haphazard experiment.

The employees at Home Depot were surprisingly really helpful.  They cut the wood to the size I needed and even explained what steps I needed to take to correctly stain the wood and seal it so it would be a nice finished product.  I ended up leaving Home Depot with six 20" pieces of wood, six 10" pieces of wood, four 60" pieces of wood, latex tubing, a piece of plywood, 1 1/2" wood screws, a one step stain/polyurethane, and some little brush things to put the stain on the wood with.

First things first, I decided that I needed to build the basic shape of the "zoo" before I worried about building any height into the thing.
I screwed two of the 20" pieces of wood to two of the 10" pieces of wood.  I used the 1 1/2" nails to hold them together, pre-drilling the holes for them so the wood didn't splinter or split.

From there, I added the 60" pieces of wood to add some height to the thing.  This was a little bit of a challenge.  Trying to hold the wood in place while drilling holes that were deep enough, but not so deep it went all the way through the boards was certainly a challenge.  Luckily I had a little help from my son.  He was pretty excited to be such a "big helper."  Especially since for the most part, I banned him and his sister from the garage while I was working on this endeavor.  From there, I continued on to make another of the square shaped frames and attached them to the stilted legs sticking up from the original rectangle shaped frame.  I attached them about mid way up from the first one, at probably about 28" on the 60" legs.  At this point, it actually started resembling something that may work out.  I was really beginning to think that this would end up an Epic Pinterest Win.


Plugging along from this point, I added the last few pieces of wood to the top to finish off the frame of the new zoo for animals.  The next step in the process was adding a stain to finish the wood.


I chose to use a stain/polyurethane combo.  This saved a few steps, as I only needed to use one product instead of two.  I picked a black satin stain, since the furniture going into the room would also be a black satin color.  I added a coat of the stain to the frame and to the plywood board and then had to call it quits for the night so that it could dry.


The next day, I sanded down the wood so that all of the edges were smooth.  After sanding all of the surfaces, adding another coat of stain to the wood was the next step.  Again, I had to call it quits after this since the stain had to be completely dry before I could do anything else to it.

The next day, I added the words Sydney's Zoo to the top of the frame.  I really debated about whether it should say Sydney's Zoo or The Zoo; in the end it seemed more personal to put Sydney's Zoo.  It was painted on in a purple acrylic paint, and then glitter paint was added to accent the lettering.  After this was dry, a clear coat of polyurethane was added to ensure that the lettering would stay put, even after the inevitable abuse they would see once the piece is placed in it's future home.


The following evening, the latex tubing and the plywood was added to the creation to finish off the project.  Tying knots in the latex tubing and then using a metal piece to screw it on was the way that it was secured to the wood.  The latex tubing is attached to all three sections of 20" wood, to ensure that it doesn't snap out of place when animals are being transported in and out of the zoo.

Screwing the plywood board to the bottom of the zoo was the last step to complete this project. 


Testing out to see if this "zoo" would actually function was something I really looked forward to.  I have never actually built something from nothing before, only pre-done kits before, so I was excited to see if it stood up to the task it was made for.


It holds all of Sydney's animals exactly how I saw it in my head!  The latex tubing works perfectly, the animals are locked down, until zookeeper Sydney lets their wild selves out.  It seems pretty stable (We'll see how it stands to Sydney's crazy antics in due time), and it looks pretty cute (IMHO).

Sydney loves her new animal cage and she already has them on lock down with occasional yard time.

What have you created from Pinterest lately?  Are you a pinner or a doer?

Tuesday, June 19, 2012

Menu Plan Monday 06/18 - 06/24


Do you ever look back at the past week and wonder, where did the time go?  That is exactly how I have felt this past week or so.  Work, friends, family, and all the other important pieces of my life have flown by in a blur of hectic craziness.

While this week is looking a little less crazy (I hope), I think I'm going to stick with simple and quick dinner's, just in case ☺.

So here's what's cooking in my kitchen this week:

Monday
Fresh Chicken Salad

Tuesday
Chicken Fajitas
Rice
Pinto Beans

Wednesday
Leftovers

Thursday
Nachos

Friday
Spaghetti
Garlic Bread
Salad

Saturday
Chicken and Broccoli Casserole
Vegetables
Bread

Sunday
Teriyaki Tacos
Rice
Beans

Still having trouble with deciding what to make?  Check out Laura's and other great gals ideas on what's cooking in their kitchens at orgjunkie.com

So what's cooking in your kitchen?

Monday, June 11, 2012

Menu Plan Monday 06/11 - 06/17


Happy Monday!  Last week really felt like it flew by for my family and me.   Just in case you haven't been following, here are a few things that happened last week.

Ashton lost his second tooth on Tuesday.  He was so proud of himself that he managed to lose another tooth so soon.  On a side note, did you know that that (see picture to the right) is what a child's skull looks like as their teeth are coming in?  A little creepy, right? 
It rained a lot here in the Tri-Cities, which is pretty unusual.  Although the rain can be a bit of a nuisance, since everything is all wet, it sure makes for some pretty rainbows.

Ashton and I made cookies for my hubby.  We made Chewy Chocolate Chip Oatmeal Cookies, and they turned out delicious.  In fact, my husband hid the cookie jar so that they didn't disappear so fast.  We just are finishing up the batch today, which is really a long time at my house.

Sydney, my four year old, managed to live up to her title, "The Wild One."

Ashton, Sydney, and I went out Friday evening and went furniture shopping.  Sydney needed some bedroom furniture, so we decided to make a date of it.  After a couple of circles around the furniture store, and several jumps on different beds, we picked out a brand new bed and dresser for my daughter, one that is not toddler sized.

After that, we went out and got recharged with dinner at Applebees, and then we went and visited Grandma.

This week, since it is the first week that the kids are out of school, I'm thinking that we are going to go for "easy" when it comes to the dinner plan.  Here's what my family is going to be having this week:


Monday
Monte Cristo Sandwiches
Goldfish


Tuesday
Chicken Tacos with Cheesy Salsa
Pinto Beans
Mexican Rice

Wednesday
Leftovers

Thursday
Hamburger Helper
Mixed Vegetables

Friday
Hawaiian Haystacks
Vegetables of some sort

Saturday
Steak
Mashed Potatoes and gravy
Green Beans

Sunday
Rice and Beef Casserole
Corn
Biscuits


Depending on how the week goes, I may try to make homemade English muffins (recipe courtesy of One Good Thing by Jillee's Blog), as well as perhaps some homemade cinnamon rolls for breakfast. 

Need more menu planning ideas?  Check out Laura's Blog, I'm an Organization Junkie.  She's got some great menu plans as well as links to some other great blogs that feature more dinner ideas.

So, what's your family having for dinner?

Friday, June 8, 2012

The Wild One...


Look at this girl.  I love her.  She stole my heart the day she was born. She is kind, smart, and beautiful.  She has a smile that lights up the room and really can be a sweetie when she is in the mood.  The key words of course... when she is in the mood.

My daughter Sydney, also known as Doodlebug, is hell on wheels.  She is such a tomboy, loves to bully her brother's and is known to instigate trouble at the drop of a hat; and she's only 4.


While some memories of her bullying and general misbehaviors are really quite funny (Walking into the house with her sitting on Ashton's head screaming at him to tapout always comes to mind), there are other times she really is exhausting.

Yesterday was one of those exhausting days.  While cleaning up after dinner, I announced to Sydney and Ashton that they needed to find the Scooby Doo movie they had chosen to rent from the movie store, since it wasn't in the case.  Since neither Sydney nor Ashton knew where it was (of course), I asked them to go look.

After a few minutes of quiet, I heard a thundering crash in the bedroom down the hall.  I ran down the hallway to see what had happened.

My lovely daughter had climbed the below pictured dresser and managed to get it to tip completely over onto the ground, along with the television, dvd player, all the clothes, and the movie's that had been on top of it.


I immediately freaked out and sent her to her room so I could calm down from realizing she nearly crushed herself, as well as pick up the dresser and the accompanying junk that she had managed to strew all over the bedroom floor. 

She managed to break the tracking on one of the drawers, as well as completely jack up the dvd player.  (If you can't tell, the front piece is no longer attached to the body of the player, it still will eject the disc, but it looks pretty beat up)


She profusely apologized, and explained that her little monkey self needed to get to the top of the dresser to see if the movie was on top. Completely logical I suppose, but considering she's a fifty pound child, she probably should avoid climbing onto objects that possibly could fall on her. 

She cried, said she never would climb again, and swore up and down that she was not the only one to blame for the dresser falling.  Her epiphany that she really is not invincible was of epic proportions.  Of course she's forgiven but....
Walking in the front door tonight, looking in the living room, I see Sydney climbing the back of the couch. 

What am I going to do with that wild child...

Thursday, June 7, 2012

Chewy Chocolate Chip Oatmeal Cookies

One of my favorite pastimes is making cookies with my children.  It is fun to watch them mixing together ingredients and creating something delicious out of ingredients that really aren't that tasty by themselves.

My husband called me from work this evening and said he's been craving cookies lately, he even went as far as to say that if I left a recipe out, he would have the kids help him make them (That is really saying something, as he very rarely cooks, and never bakes!).

So after laying my youngest down to bed, my six year old, Ashton, and I buckled down and decided to make some cookies.   After some indecision (Ashton says that peanut butter cookies are the way to go), we compromised on Chewy Chocolate Chip Oatmeal Cookies (truly not much of a compromise, as it is one of my favorites). 

The help (Ashton)

In a large bowl, cream together the butter, brown sugar, and white sugar until smooth.
Ashton putting butter in the mixer
Beat in eggs one at a time, then stir in vanilla.  Combine the flour, baking soda, and salt; stir into the creamed mixture until just blended. 


Mix in the quick oats, walnuts, chocolate chips, and butterscotch chips.  Refrigerate for 30 minutes.   While the cookie dough is refrigerating, I usually wash up the dishes so there is less clean up.  Ashton really enjoys helping on this part ☺


Preheat oven to 325 degrees.  Drop cookie dough by heaping spoonfuls onto ungreased cookie sheets.  Bake cookies 14-16 minutes.  Allow cookies to cool on baking sheet for 5 minutes before transferring to a wire rack to cool completely.


Then, devour in a horrifyingly violent manner.


Chewy Chocolate Chip Oatmeal Cookies
adapted from allrecipes.com

1 cup butter, softened
1 cup packed light brown sugar
1/2 cup white sugar
2 eggs
2 tsp. vanilla extract
1 1/2 cups all-purpose flour
1 tsp. baking soda
1/2 tsp. salt
3 - 3 1/2 cups quick-cooking oats
1 cup chopped walnuts
1/2 cup semisweet chocolate chips
1/2 cup butterscotch chips

In a large bowl, cream together the butter, brown sugar, and white sugar until smooth.  Beat in eggs one at a time, then stir in vanilla.  Combine the flour, baking soda, and salt; stir into the creamed mixture until just blended.  Mix in the quick oats, walnuts, and chocolate chips.  Refrigerate for 30 minutes. 

Preheat oven to 325 degrees.

 Drop by heaping spoonfuls onto ungreased baking sheets.  Bake for 14-15 minutes in the preheated oven.  Allow cookies to cool on baking sheet for 5 minutes before transferring to a wire rack to cool completely.